
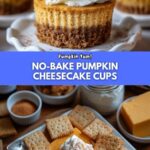
If you’re looking for an irresistibly creamy, festive treat that comes together effortlessly, you’ve just found your new favorite dessert. This No-Bake Pumpkin Cheesecake Cups Recipe combines the warm spices of autumn with the silky richness of cheesecake, all layered over a buttery graham cracker crust. Whether you’re craving a quick after-dinner delight or planning a cozy fall gathering, these easy-to-make cups offer pure comfort in every bite without ever heating the oven. I can’t wait to share how simple and delicious this dessert can be!

Ingredients You’ll Need
Each ingredient in this recipe plays a crucial role in creating the perfect balance of flavors and textures. From the crunchy, buttery crust to the smooth, spiced pumpkin filling, every element has been thoughtfully chosen to bring out the best in this easy fall favorite.
- Graham cracker crumbs: Provide a crispy, slightly sweet foundation with just the right amount of crunch.
- Melted butter: Binds the crust ingredients together and adds richness.
- Brown sugar: Adds a hint of molasses flavor and enhances the crust’s sweetness.
- Cream cheese (softened): The creamy base ensures a smooth, luscious cheesecake texture.
- Canned pumpkin puree: Brings in that classic fall flavor plus a beautiful vibrant color.
- Powdered sugar: Sweetens the filling without graininess, keeping it silky smooth.
- Ground cinnamon: Gives warm, spicy depth that perfectly complements pumpkin.
- Ground nutmeg: Adds a subtle hint of nutty spice for complexity.
- Ground ginger: Introduces a gentle zing that lifts the whole flavor profile.
- Vanilla extract: Enhances all the spices and ties the filling flavors beautifully together.
- Whipped topping or whipped cream: Lightens the filling and adds fluffy texture; also perfect for garnish.
- Crushed graham crackers and cinnamon (optional): Great for a final decorative touch and extra crunch.
How to Make No-Bake Pumpkin Cheesecake Cups Recipe
Step 1: Prepare the Crust
Start by mixing the graham cracker crumbs, melted butter, and brown sugar in a bowl until everything is combined and looks uniformly damp. Spoon about 2 tablespoons of this mixture into the bottom of each cup or jar, pressing gently so the crust holds its shape and forms a firm base. This crust sets the stage by giving a buttery crunch that perfectly balances the creamy filling.
Step 2: Make the Pumpkin Cheesecake Filling
In a clean bowl, beat the softened cream cheese until it’s velvety and smooth—no lumps here! Next, add the pumpkin puree, powdered sugar, cinnamon, nutmeg, ginger, and vanilla extract. Mix everything together until the spices are fully incorporated and the mixture is lovely and even in color. This combination creates that enchanting aroma and the signature fall taste you’re after.
Step 3: Fold in the Whipped Topping
Gently fold the whipped topping or whipped cream into your pumpkin filling. This step is essential to keep the texture light and fluffy, making each bite feel indulgent without being heavy. Be sure to mix carefully so the airiness of the whipped topping is maintained.
Step 4: Assemble and Chill
Spoon or pipe the luscious pumpkin cheesecake filling over the crust in each cup, making sure to fill every jar evenly. Place the cups in your refrigerator and allow them to chill for at least one hour. This resting time lets the flavors meld together and the filling to firm up just right.
How to Serve No-Bake Pumpkin Cheesecake Cups Recipe
Garnishes
Top these pudding-perfect cups with a swirl of extra whipped cream for creaminess and lightness. Sprinkle crushed graham crackers and a dash of cinnamon on top to add a little crunch and a burst of cozy fall flavor. These small touches elevate the dessert from simple to spectacular.
Side Dishes
Serve alongside a hot cup of coffee, chai latte, or even a spiced apple cider to complement the pumpkin’s warm spices. For a festive spread, add spiced nuts or cinnamon-dusted roasted pumpkin seeds. These pairings turn your dessert into a true autumn celebration.
Creative Ways to Present
Try layering the No-Bake Pumpkin Cheesecake Cups Recipe in clear mason jars or mini glass bowls so everyone can admire the beautiful layers. If you’re feeling extra fancy, top with a drizzle of caramel sauce or sprinkle with mini chocolate chips or toasted pecans. Individual servings make this dessert perfect for parties or cozy evenings in.
Make Ahead and Storage
Storing Leftovers
These cheesecake cups keep incredibly well in the refrigerator for up to two days. Cover them tightly with plastic wrap or lids to prevent them from absorbing other fridge odors. The flavors even deepen after a day, making leftovers just as delightful as freshly made cups.
Freezing
While this recipe is best enjoyed fresh or chilled, you can freeze the no-bake pumpkin cheesecake cups for up to a month. Just remember to use freezer-safe containers and allow them to thaw overnight in the fridge before serving. The texture might soften slightly after freezing, but the flavor remains on point.
Reheating
Since this is a no-bake recipe meant to be served chilled, reheating isn’t necessary or recommended. Simply pop the cheesecake cups in the fridge to thaw if frozen, and enjoy them cool and creamy as intended.
FAQs
Can I use fresh pumpkin instead of canned pumpkin puree?
Fresh pumpkin can be used, but it requires cooking and pureeing first to achieve the smooth texture and moisture level similar to canned pumpkin puree. The canned version simplifies the process and ensures consistent results for your No-Bake Pumpkin Cheesecake Cups Recipe.
Is it possible to make this recipe dairy-free?
Absolutely! Substitute the cream cheese with a dairy-free alternative such as cashew cream cheese, and use coconut whipped topping. Make sure to check the ingredient labels for your substitutions to maintain the best texture and flavor.
Can I make this recipe gluten-free?
Yes, just swap the graham cracker crumbs with gluten-free graham crackers or crushed gluten-free digestive biscuits. Your No-Bake Pumpkin Cheesecake Cups Recipe will still have that perfect crust texture without gluten.
How long should I chill the cups before serving?
A minimum of one hour is recommended so the filling sets properly. If you have the time, chilling for two hours or more will help the flavors meld even better and firm up the texture to an ideal consistency.
Can I double the recipe for a larger batch?
Definitely! This recipe scales easily. Just double all ingredients and prepare more cups accordingly. Just be mindful to have enough refrigerator space to chill your expanded batch properly.
Final Thoughts
Making these No-Bake Pumpkin Cheesecake Cups Recipe has been one of my favorite ways to welcome the flavors of fall into my kitchen without fuss or lengthy baking times. The creamy pumpkin filling combined with the crispy graham crust is truly a crowd-pleaser that feels both indulgent and refreshing. Give it a try and watch how this simple, lovingly crafted dessert becomes an instant classic at your table!
Print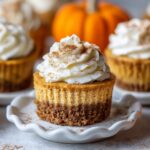
No-Bake Pumpkin Cheesecake Cups Recipe
- Prep Time: 15 minutes
- Cook Time: 0 minutes
- Total Time: 1 hour 15 minutes
- Yield: 6 cups
- Category: Dessert
- Method: No-Bake
- Cuisine: American
- Diet: Vegetarian
Description
Delight in these easy No-Bake Pumpkin Cheesecake Cups, perfect for a quick and delicious fall dessert. Featuring a spiced pumpkin cheesecake filling layered over a buttery graham cracker crust, these individual cups are creamy, flavorful, and require no baking—ideal for effortless entertaining or a cozy treat.
Ingredients
Crust:
- 1 cup graham cracker crumbs
- 3 tablespoons melted butter
- 1 tablespoon brown sugar
Filling:
- 8 oz cream cheese, softened
- 1/2 cup canned pumpkin puree
- 1/3 cup powdered sugar
- 1/2 teaspoon ground cinnamon
- 1/4 teaspoon ground nutmeg
- 1/4 teaspoon ground ginger
- 1/2 teaspoon vanilla extract
- 1 cup whipped topping or whipped cream (plus more for garnish)
Topping (optional):
- Crushed graham crackers
- Pinch of cinnamon
Instructions
- Prepare the crust: In a bowl, combine graham cracker crumbs, melted butter, and brown sugar. Mix well until the crumbs are evenly coated. Spoon approximately 2 tablespoons of this mixture into the bottom of each of 6 small cups or jars, pressing down gently to form a compact base.
- Make the filling: In a separate bowl, beat the softened cream cheese until smooth and creamy. Add pumpkin puree, powdered sugar, ground cinnamon, nutmeg, ginger, and vanilla extract. Mix thoroughly until all ingredients are fully blended.
- Fold in whipped topping: Gently fold the whipped topping or whipped cream into the pumpkin mixture until the filling is smooth and fluffy, taking care not to deflate the mixture.
- Assemble the cups: Spoon or pipe the pumpkin cheesecake filling evenly over the graham cracker crust in each cup, filling them up.
- Chill: Refrigerate the assembled cups for at least 1 hour to allow the cheesecake filling to set properly.
- Add garnish and serve: Before serving, top each cup with extra whipped cream, crushed graham crackers, and a pinch of cinnamon if desired for added texture and flavor.
Notes
- These cheesecake cups can be prepared up to 2 days in advance and stored in the refrigerator.
- For a lighter version, substitute reduced-fat cream cheese and light whipped topping.
- Crushed gingersnap cookies can be used instead of graham crackers to add a spicy twist.
