Description
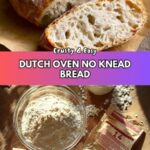
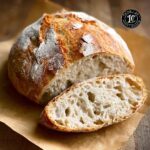
This Dutch Oven No Knead Crusty Bread recipe yields a rustic, artisan-style loaf with a crunchy crust and a soft, airy interior. It requires minimal effort, no kneading, and uses the Dutch oven to create optimal baking conditions for a perfectly crusty finish.
Ingredients
Scale
Ingredients
- 1 1/2 cups warm water (about 100 degrees F)
- 1 packet yeast (active dry, instant, or quick rise – 2.25 teaspoons)
- 1 ½ teaspoons fine grain salt
- 3 1/4 cups all-purpose flour
Instructions
- Mix yeast and water: In a large bowl, combine the warm water, yeast, and salt; stir until the yeast is fully dissolved.
- Add flour and form dough: Add the flour all at once and stir until a sticky dough forms, ensuring the flour is mostly incorporated.
- Let dough rise: Cover the bowl loosely and leave it in a warm spot for 2 to 3 hours, or until the dough has doubled in size.
- Preheat Dutch oven: Place a Dutch oven with its lid inside your oven and preheat to 450 degrees F to ensure it is very hot.
- Shape dough: Transfer the risen dough onto a floured piece of parchment paper and shape it into a round loaf.
- Score the loaf: Optionally, use a sharp knife or razor blade to make slits on the top of the loaf to allow controlled expansion during baking.
- Bake covered: Using the parchment paper, carefully place the dough loaf into the hot Dutch oven, cover with the lid, and bake for 35 minutes.
- Bake uncovered: Remove the lid and bake for an additional 5-10 minutes until the crust is a deep golden brown and crisp.
- Cool: Remove the bread from the Dutch oven and cool on a wire rack for at least 10 minutes before slicing to allow the crumb to set.
Notes
- Make sure the water is warm but not hot to activate the yeast properly without killing it.
- Do not knead the dough; its stickiness is key to developing texture naturally during the rise.
- Letting the dough rise in a consistently warm environment speeds fermentation and improves flavor.
- Using parchment paper makes transferring the dough to the Dutch oven easier and prevents sticking.
- Scoring the loaf is optional but helps prevent the bread from bursting irregularly while baking.
- Allowing the bread to cool before slicing results in better texture and flavor development.