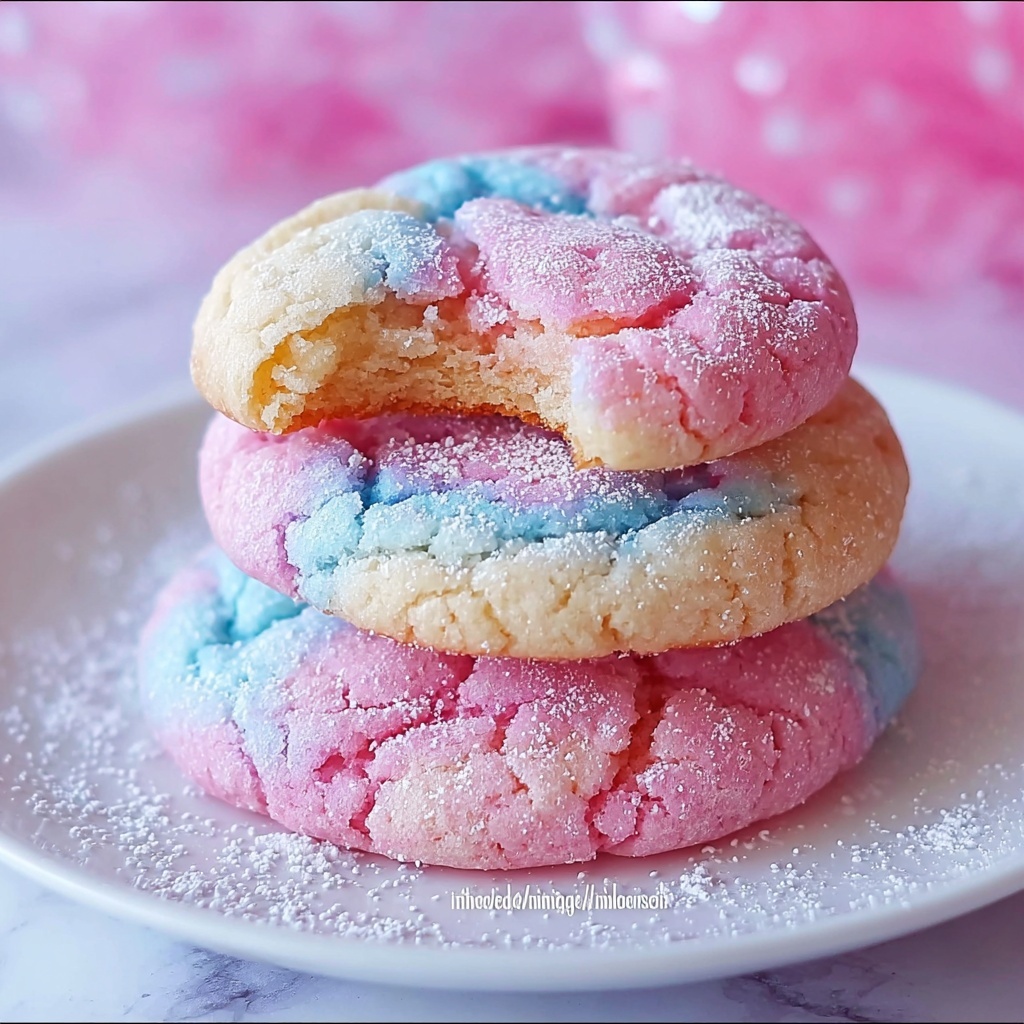
If you’re looking to bring a playful splash of color and a hint of childhood whimsy into your baking adventures, this Cotton Candy Cookies Recipe is an absolute must-try. These cookies capture that fluffy, sugary essence of cotton candy with every bite, boasting vibrant pink and blue swirls that delight the eyes as much as the taste buds. Soft, lightly sweet, and dusted with a delicate powdered sugar finish, they turn ordinary cookie time into a festive treat perfect for gatherings, celebrations, or a joyful snack to brighten your day.
Ingredients You’ll Need
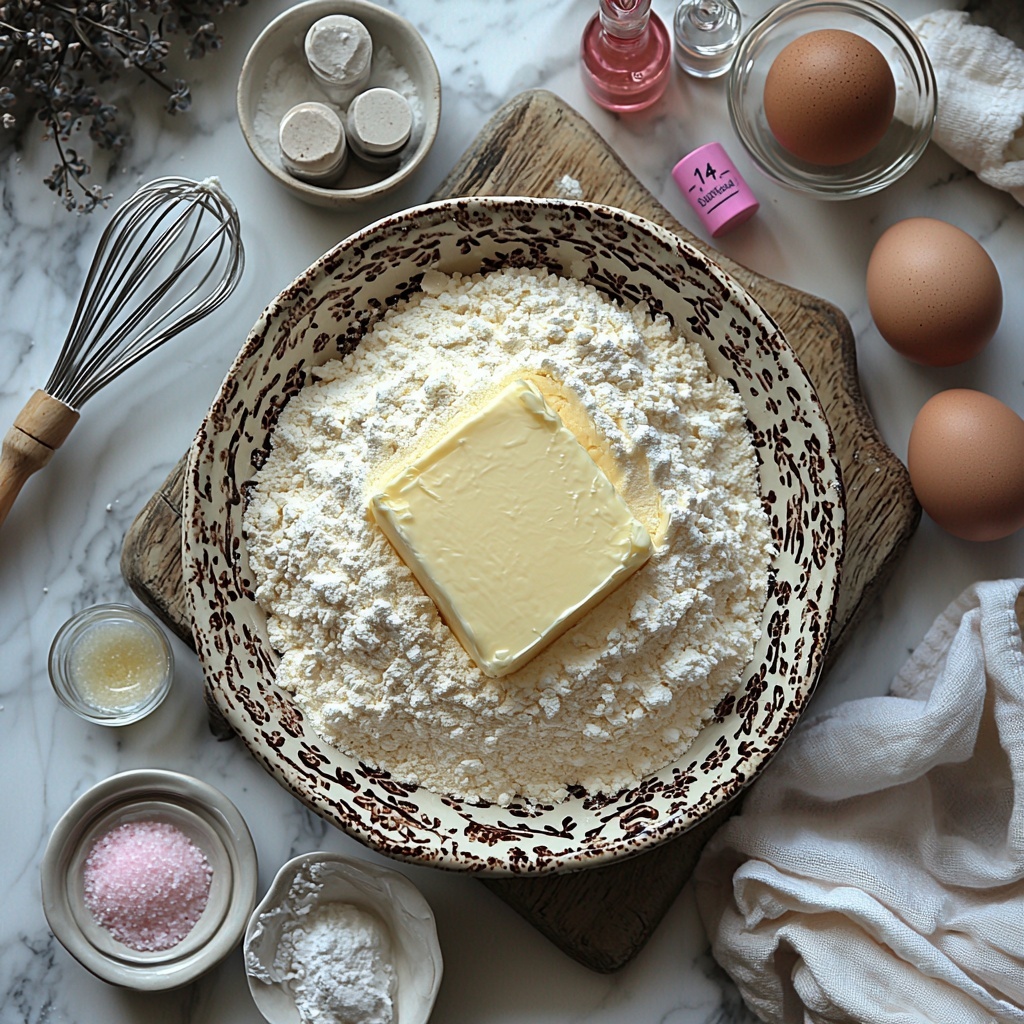
The magic of this Cotton Candy Cookies Recipe lies in its simple yet thoughtfully chosen ingredients. Each plays its own crucial role, whether it’s the flour for structure, butter for richness, or that special cotton candy flavoring to lift the experience. The colorful food coloring adds an irresistible visual pop, making these cookies as pretty as they are delicious.
- All-purpose flour (2 ¾ cups): The foundational ingredient that gives these cookies their perfect tender crumb.
- Baking soda (1 teaspoon): Helps the cookies rise just enough for that soft texture.
- Baking powder (½ teaspoon): Works alongside baking soda to ensure a balanced lift without spreading.
- Salt (½ teaspoon): Enhances the sweetness and balances the flavor perfectly.
- Unsalted butter, softened (1 cup): Key for creaminess and that melt-in-your-mouth feel.
- Granulated sugar (1 ½ cups): Provides sweetness and a slight crunch when baked.
- Large egg (1): Binds everything together and adds moisture.
- Vanilla extract (2 teaspoons): Adds warmth and depth to every bite.
- Cotton candy flavoring (½ teaspoon, optional): This special touch replicates the classic carnival taste.
- Pink and blue food coloring: These brighten up the dough and create the iconic cotton candy swirls.
- Powdered sugar: For dusting and adding a soft, snowy finish.
How to Make Cotton Candy Cookies Recipe
Step 1: Prepare the Dough
Start by whisking the all-purpose flour, baking soda, baking powder, and salt together in a medium bowl. In a separate large bowl, beat the softened butter and sugar together until the mixture is light and fluffy—this step is key for the cookie’s tender texture. Next, add the egg, vanilla extract, and if you want that authentic carnival vibe, the cotton candy flavoring. Mix everything well before gradually incorporating the dry ingredients, stirring until you have a smooth, cohesive dough.
Step 2: Add the Colors
Now for the fun and eye-catching part! Divide the dough evenly into two bowls. Add pink food coloring to one bowl and blue food coloring to the other, mixing each until you get vibrant colors. To create that magical cotton candy swirl, gently combine portions of each colored dough in one bowl—avoid overmixing here to preserve those pretty marbled patterns.
Step 3: Shape and Bake
Preheat your oven to 350°F (175°C) and line a baking sheet with parchment paper to prevent sticking. Roll tablespoon-sized balls of the marbled dough and place them on the baking sheet, spacing them about 2 inches apart to allow for gentle spreading. Bake for 8 to 10 minutes, watching closely until the cookie edges are just set but still soft to the touch.
Step 4: Dust and Cool
Once baked, let the cookies rest on the sheet for about 5 minutes to gently firm up. Then transfer them to a wire rack to cool completely. While they’re still a little warm, lightly dust with powdered sugar to give that frosty, dreamy finish that echoes the feel of fresh cotton candy.
How to Serve Cotton Candy Cookies Recipe
Garnishes
Adding a sprinkle of edible glitter or a few fun pastel sprinkles can elevate the whimsical nature of this recipe. For an extra touch, try drizzling some white chocolate over the cooled cookies, which pairs beautifully with the soft sweetness of the cotton candy flavor. Garnishes can add both a pop of personality and an extra layer of taste.
Side Dishes
Cotton Candy Cookies shine when teamed with simple, complementary treats. Consider serving them alongside a tall glass of cold milk or a delicate lavender or chamomile tea to balance the sugary notes. For parties, they’re fantastic next to mini cupcakes or colorful fruit platters, adding to the festive, fairground-inspired theme.
Creative Ways to Present
Presentation can turn these delightful cookies into memorable conversation starters. Stack them on a pastel-tiered cake stand, or serve them in clear glass jars tied with a ribbon for gifting. Layer the cookies in a dessert trifle with whipped cream and berries for a surprising twist, or even sandwich them with a light marshmallow filling to ramp up the carnival flair.
Make Ahead and Storage
Storing Leftovers
These Cotton Candy Cookies keep beautifully in an airtight container at room temperature for up to a week. Keeping them away from sunlight helps preserve their bright colors and soft texture, so choose a cool, dry spot in your kitchen.
Freezing
If you want to save some for later, these cookies freeze very well. Place them in a single layer on a baking sheet to flash freeze, then transfer to a freezer-safe container or bag. They’ll stay fresh for up to three months. When you’re ready, thaw them at room temperature gently before serving.
Reheating
To revive the freshness, warm the cookies in a preheated oven at 300°F (150°C) for about 5 minutes. This quick heat refreshes the softness and enhances that fluffy cotton candy sensation without overcooking the edges.
FAQs
Can I make this recipe without cotton candy flavoring?
Absolutely! The cookies will still be delicious with just vanilla extract offering a gentle sweetness. The flavoring is optional but adds that authentic carnival taste if you want to go all in.
What if I don’t have pink or blue food coloring?
You can use any food coloring you have on hand, such as purple or teal, to personalize your cotton candy cookies. The key is to create contrasting, fun colors that mimic the look of cotton candy.
Are these cookies crispy or soft?
This Cotton Candy Cookies Recipe yields cookies that are soft and tender, perfect for those who love a chewy, melt-in-your-mouth experience rather than a crunchy bite.
Can I use salted butter instead of unsalted?
You can, but be sure to reduce or omit additional salt in the recipe to keep the flavors balanced and avoid them tasting salty.
How do I ensure the marbled effect stays vibrant?
Be gentle when combining the colored doughs—fold or lightly swirl instead of thoroughly mixing. This preserves the distinct pink and blue swirls that make these cookies so visually special.
Final Thoughts
This Cotton Candy Cookies Recipe is such a joyful way to bring color, sweetness, and nostalgia together in one delightful treat. Whether you bake them for a party, a fun activity with kids, or just to brighten your day, these cookies never fail to impress and charm. I wholeheartedly encourage you to try making them—once you do, they’ll quickly become one of your favorite cookies that you just can’t wait to share with friends and family.
Print
Cotton Candy Cookies Recipe
- Prep Time: 15 minutes
- Cook Time: 10 minutes
- Total Time: 30 minutes
- Yield: 24 servings
- Category: Dessert
- Method: Baking
- Cuisine: American
Description
These whimsical Cotton Candy Cookies feature a delightful marbled pink and blue dough with a subtle cotton candy flavor. Light, fluffy, and sweet, they make perfect treats for parties or a fun dessert, appealing to both kids and adults alike.
Ingredients
Dry Ingredients
- 2 ¾ cups all-purpose flour
- 1 teaspoon baking soda
- ½ teaspoon baking powder
- ½ teaspoon salt
Wet Ingredients
- 1 cup unsalted butter, softened
- 1 ½ cups granulated sugar
- 1 large egg
- 2 teaspoons vanilla extract
- ½ teaspoon cotton candy flavoring (optional)
Color and Finish
- Pink food coloring
- Blue food coloring
- Powdered sugar for dusting
Instructions
- Prepare the Dough: In a medium bowl, whisk together the all-purpose flour, baking soda, baking powder, and salt. In a separate large bowl, beat the softened butter and granulated sugar together until the mixture is light and fluffy. Add the egg, vanilla extract, and cotton candy flavoring if using, mixing well to combine. Gradually incorporate the dry flour mixture into the wet ingredients until you have a smooth dough.
- Add the Colors: Divide the dough evenly into two separate bowls. Add pink food coloring to one bowl and blue food coloring to the other. Stir each until the color is fully blended and evenly distributed. Then, gently combine small portions of each colored dough to create a beautiful marbled effect, being careful not to overmix.
- Shape and Bake: Preheat your oven to 350°F (175°C) and line a baking sheet with parchment paper. Roll tablespoon-sized balls of the marbled dough and place them about 2 inches apart on the prepared baking sheet to allow for spreading. Bake the cookies for 8 to 10 minutes, or until the edges are set but the center still appears soft.
- Dust and Cool: Allow the cookies to cool on the baking sheet for about 5 minutes after removing from the oven, then transfer them to a wire rack to cool completely. While still warm, dust the cookies lightly with powdered sugar to create a frosty, cotton candy-inspired finish.
Notes
- Use gel food coloring for more vibrant dough colors without changing the dough consistency.
- For a stronger cotton candy flavor, adjust the flavoring to taste but do not exceed 1 teaspoon.
- Chill the dough for 15 minutes before baking if you want less spreading and thicker cookies.
- Store cookies in an airtight container at room temperature for up to 5 days.
- These cookies freeze well—wrap tightly and freeze up to 3 months.


